
Take pictures
To activate the main camera, rotate the display to the
imaging mode. If the camera is in the video mode, use the
camera mode key to switch to the still image mode.
To lock the focus on an object, press the capture key
halfway down (main camera only). The green locked focus
indicator appears on the display. If the focus was not
locked, the red focus indicator appears. Release the
capture key, and press it halfway down again. You can,
however, take the picture without locking the focus.
To take a picture, in the main camera, press the capture
key. Do not move the device before the image is saved.
To make lighting and color adjustments before taking a
picture in the still image mode, scroll through the toolbar.
See ‘Setup settings—color and lighting’, p. 29.
Saving the captured image may take longer if you change
the zoom, lighting, or color settings.
Camera
27
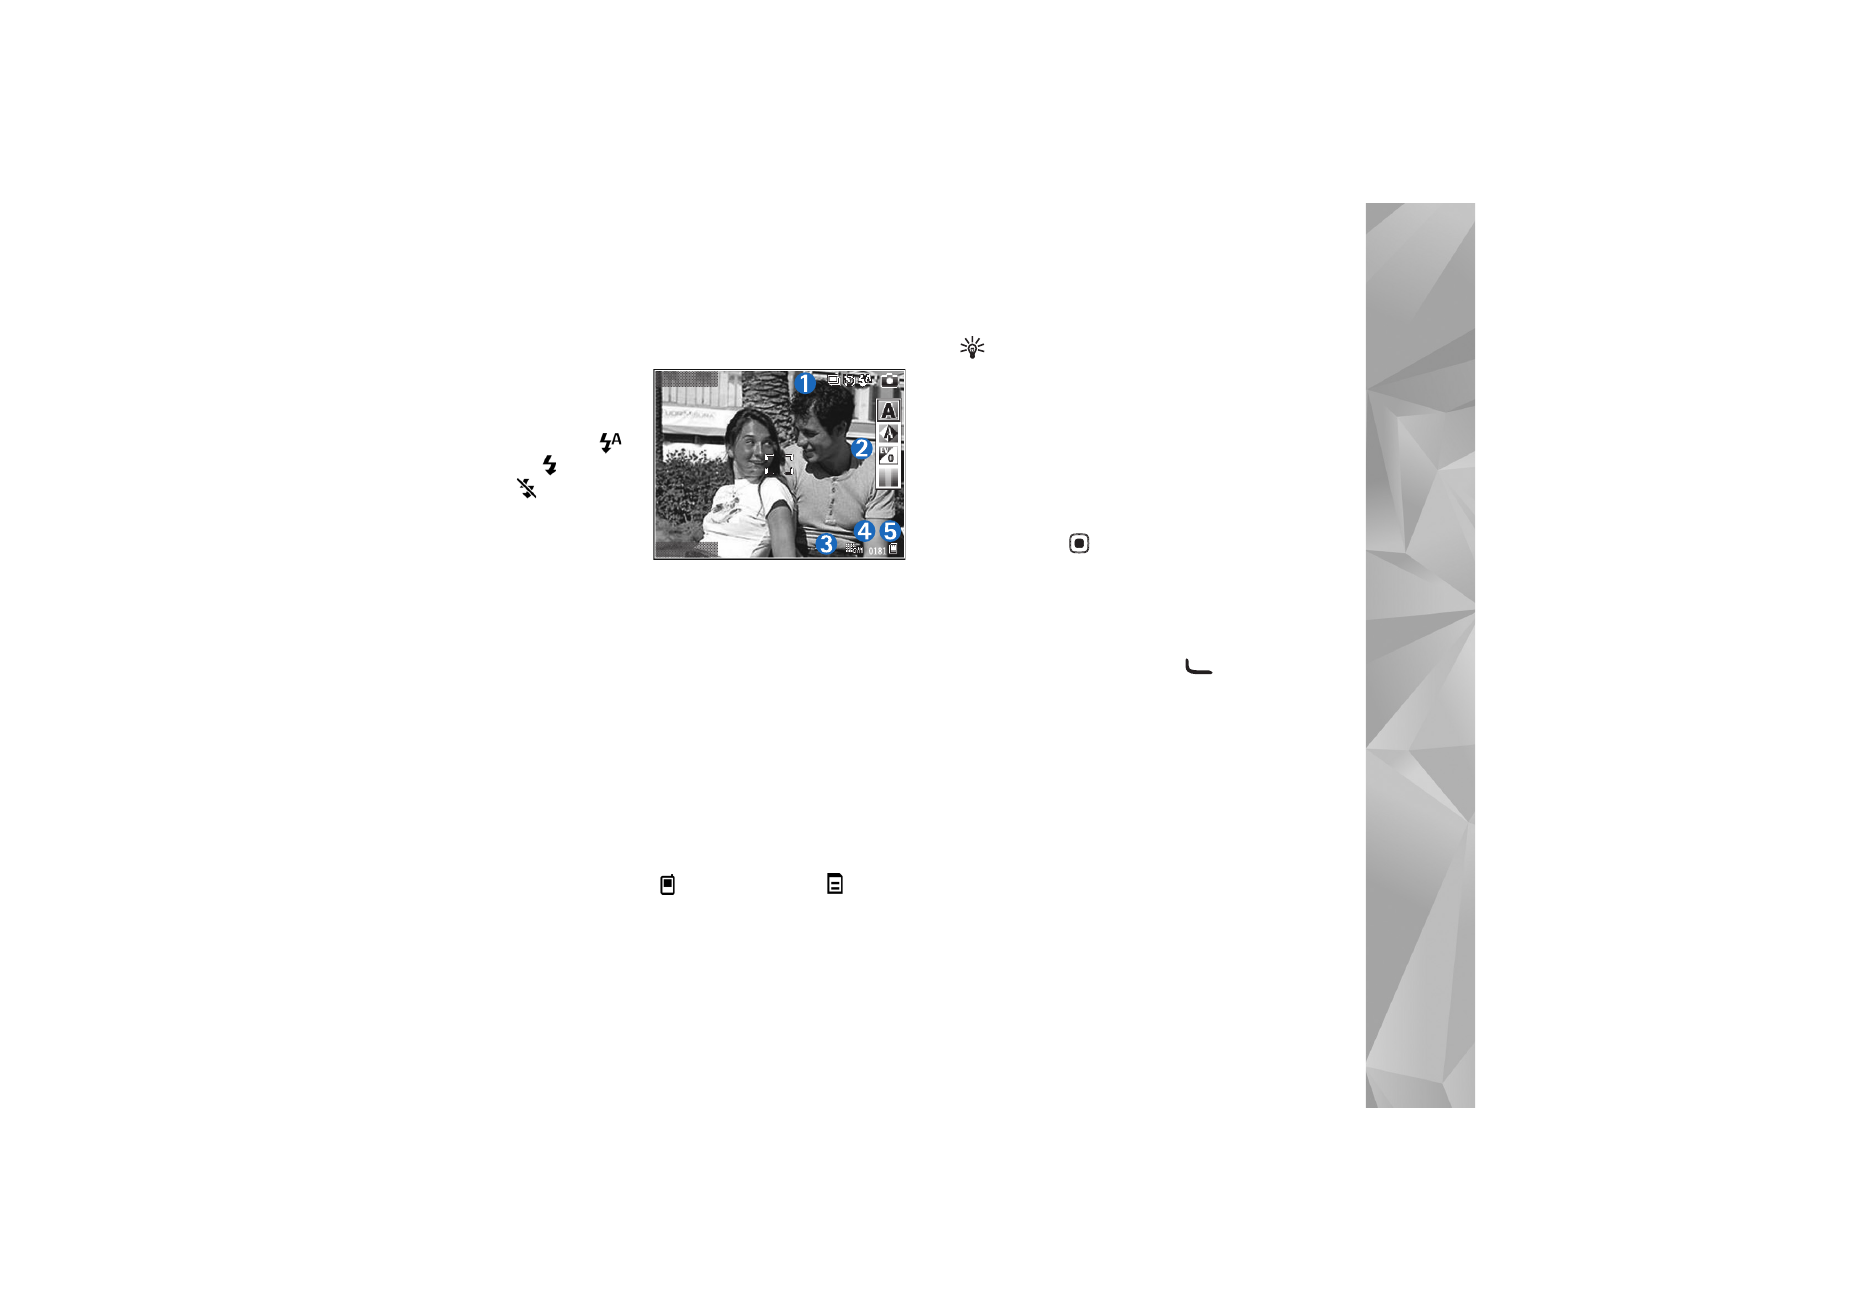
The camera viewfinder displays the following:
•
Status indicators
(1) for sequence
on, self-timer on;
Automatic
(
),
On
(
), or
Off
(
) flash mode,
and the current
capture mode
•
The toolbar (2),
which you can
scroll through before capturing the image to select the
shooting mode, white balance, exposure value, and
color tone (the toolbar is not displayed during focus
and image capture)
•
The image resolution indicator (3) indicates whether
the quality of the image is
Print 3M - Large
(2048x1536 resolution),
Print 2M - Med.
(1600x1200
resolution),
Print 1.3M - Small
(1280x960 resolution),
or
MMS 0.3M
(640x480 resolution).
•
The image counter (4) displays the estimated number of
images you can capture using the current image quality
setting and memory in use (the counter is not displayed
during focus and image capture).
•
The device memory (
) and memory card (
)
indicators (5) show where images are saved.
Tip! Select
Options
>
Turn icons on
to display all
viewfinder indicators or
Turn icons off
to display
only the camera status indicators.
When taking a picture, note the following:
•
The quality of a digitally zoomed picture is lower than
that of a nonzoomed picture.
•
The camera goes into the battery saving mode if there
are no keypresses for a moment. To continue taking
pictures, press
.
After you take the picture, select the following from the
toolbar:
•
If you do not want to keep the image, select
Delete
.
•
To send the video using multimedia, e-mail, Bluetooth
connectivity, or infrared, press
, or select
Send
.
•
To capture a new image, select
New image
.
•
To print the picture, select
. See ‘Image print’,
p. 36.
Still image camera settings
There are two kinds of settings for the still image camera:
Image setup
and main settings. To adjust image setup, see
‘Setup settings—color and lighting’, p. 29. The setup
settings return to the default settings after you close the
camera, but the main settings remain the same until you
change them again. To change the main settings, select
Options
>
Settings
and from the following:
Exit
Options

Camera
28
Image quality
—
Print 3M - Large
(2048x1536
resolution),
Print 2M - Med.
(1600x1200 resolution),
Print 1.3M - Small
(1280x960 resolution), or
MMS
0.3M
(640x480 resolution). The higher the resolution, the
more memory the image consumes. If you want to print
the image, select
Print 3M - Large
,
Print 2M - Med.
, or
Print 1.3M - Small
. If you want to send it through e-mail,
select
Print 1.3M - Small
. To send the image through
MMS, select
MMS 0.3M
.
These resolutions are only available in the main camera.
Add to album
—Select whether you want to save the
image to a certain album in
Gallery
. If you select
Yes
, a
list of available albums opens. The image is automatically
saved to the selected album after capture. Change the
setting after you finish taking pictures for the selected
album.
Show captured image
—Select
Yes
if you want to see the
captured image after it is taken, or
No
if you want to
continue taking pictures right away.
Extended zoom
(main camera only)—Select
On
(continuous)
to allow the zoom increments to be smooth
and continuous between digital and extended digital
zoom or
On (paused)
to allow the zoom increments to
pause at the digital and extended digital step point. If you
want to limit the zoom to where the selected image
quality is maintained, select
Off
.
Flicker cancellation
—Select
50Hz
or
60Hz
.
Shutter tone
—Select the tone you want to hear when you
take a picture.
Memory in use
—Select where to store your images.
Take pictures in a sequence
Sequence mode
is available only in the main camera.
To set the camera to take up to six pictures in a sequence
(if enough memory available), select
Options
>
Sequence
mode
.
To take the pictures, press the capture key.
After you take the pictures, they are shown in a grid on the
display. To view a picture, press
to open it.
You can also use the sequence mode with the self-timer.
To return to the sequence mode viewfinder, press the
capture key.
You in the picture—self-timer
The self-timer is available only in the main camera.
Use the self-timer to delay the capture so that you can
include yourself in the picture. To set the self-timer delay,
select
Options
>
Self timer
>
2 seconds
,
10 seconds
, or
20 seconds
. To activate the self-timer, select
Activate
. The

Camera
29
self-timer indicator (
) blinks and the device beeps when
the timer is running. The camera takes the picture after the
selected delay elapses.
You can also use the self-timer in the sequence mode.
Tip! Select
Options
>
Self timer
>
2 seconds
to keep
your hand steady when taking a picture.
Flash
The flash is available only in the main camera.
Keep a safe distance when using the flash. Do not use the
flash on people or animals at close range. Do not cover the
flash while taking a picture.
The camera has an LED flash for low light conditions. The
following flash modes are available:
Automatic
(
),
On
(
), and
Off
(
).
To switch between the flash modes, press the flash key.
Setup settings—color and lighting
To enable the camera to reproduce colors and lighting
more accurately or to add effects to your pictures or
videos, scroll through the toolbar, and select from the
following options:
Shooting mode
—Select a proper shooting mode for the
environment in which you take pictures. Every shooting
mode uses its own lighting settings that have been
adjusted according to a certain kind of environment.
White balance
—Select the current lighting condition
from the list. This allows the camera to reproduce colors
more accurately.
Exposure value
(images only)—Adjust the exposure time
of the camera.
Colour tone
—Select a color effect from the list.
The screen display changes to match any settings you
make so you see how the change affects the pictures or
videos.
The available settings vary depending on the selected
camera.
The setup settings are camera specific; if you change the
settings in the secondary camera, the settings in the main
camera do not change. The setup settings do, however,
transfer between the image and video modes. The setup
settings return to the default settings when you close the
camera.
Shooting modes
A shooting mode helps you to find the right color and
lighting settings for the current environment. Select a
proper shooting mode for taking pictures or recording
video clips from the shooting mode list. The settings of

Camera
30
each shooting mode have been set according to a certain
style or environment.
Shooting modes are only available in the main camera.
Scroll through the toolbar, and select the video or image
shooting modes.
When you take pictures, the default shooting mode is
Automatic
.
To make your own shooting mode suitable for a certain
environment in the still image mode, select
User
>
Options
>
Change
. In the user defined shooting mode you
can adjust different lighting and color settings. To copy
the settings of another shooting mode, select
Based on
shooting mode
and the desired shooting mode.